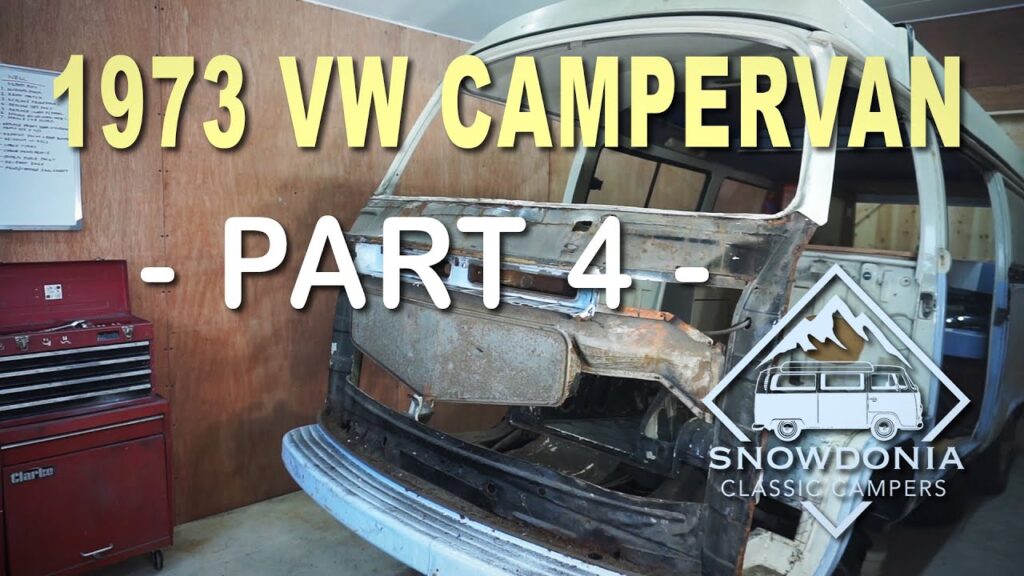
In the fourth part of the 1973 VW Campervan Restoration series, the video showcases the process of removing the front panel of Nell, a 1973 VW camper van, in preparation for the 2020 hire season. The host begins by marking the cut areas on the front panel using a marker pen, ensuring precision and avoiding unnecessary damage. After rounding the edges and cutting off the panel, the video reveals the extent of rust issues in various parts of the bus, including the A-posts and the top windscreen inner panel. The host discusses the need for replacements and proceeds to remove additional components, such as the heater vent flaps and the wiring. The episode concludes with the removal of the remaining original front panel and planning for the next steps, including the installation of repair sections and fabricating raised ribs for the replacement panel. Throughout the video, the host provides commentary and demonstrates the use of various tools and equipment required for the restoration project.

Check out these awesome Van Life Guides!
Preparing Nell for the 2020 Hire Season
Introduction to the restoration process
When preparing Nell for the 2020 hire season, it’s important to go through a meticulous restoration process to ensure that she is in top-notch condition. This article will guide you through the necessary steps to prepare Nell for the upcoming season, focusing specifically on the importance of removing the front panel. Properly executing this step is crucial, as it will allow you to assess any rust issues and determine the extent of repairs needed.
The importance of removing the front panel
Why is removing the front panel such a crucial step in the restoration process? Well, the front panel is the first part of Nell’s body that you’ll want to examine closely. By removing it, you’ll gain access to the inner components and be able to evaluate any rust issues that may have developed over time. Additionally, you’ll also be able to identify any potential repairs that need to be carried out. Removing the front panel is essentially the first step towards restoring Nell to her former glory.
Marking Out the Cut Areas
Using a marker pen to mark the cut lines
Before you actually start cutting the front panel, it’s important to carefully mark out the areas that you’ll be cutting. This step ensures that you have clear guidelines to follow, minimizing errors and potential damage to other parts. Using a marker pen, draw the cut lines where you want to remove the front panel. Take your time and make the lines as precise and accurate as possible.
Ensuring not to cut through any important parts
While marking out the cut lines, it’s equally important to ensure that you don’t cut through any important parts. Pay close attention to the inner components and make sure that the cut lines avoid them. It would be a major setback if you accidentally damage essential parts while removing the front panel. Double-check your markings and make any necessary adjustments before proceeding to the next step.
Rounding the Edge to Release the Lip
Starting the process of removing the front panel
With the marked cut lines in place, you can now begin the process of actually removing the front panel. Start by carefully rounding the edges of the marked lines. This allows the lip of the front panel to be released more easily, facilitating its removal. The rounding process should be done with precision, ensuring that the lip becomes flexible without causing any damage to the surrounding areas.
Rounding the edges to release the lip
Rounding the edges is a crucial step in removing the front panel. By doing so, you create a smooth transition between the panel and the rest of Nell’s body. This allows the lip to be released without any resistance. Take your time and ensure that all edges are properly rounded. By doing this correctly, you’ll set the stage for a seamless removal of the front panel, making the entire restoration process much more manageable.
If You Love Van Life, You Will Not Want To Miss These, Click Here to Read More Awesome!
Cutting Off the Front Panel
Getting a closer look at the rust issues
Once the lip has been released, you can now get a closer look at the rust issues that may have developed on the front panel. Carefully examine the affected areas and assess the extent of the rust damage. This step is crucial in determining the repairs needed to restore Nell’s front panel to its original condition. By thoroughly inspecting the rust issues, you can create a detailed plan of action and ensure that all necessary repairs are carried out.
Assessing the repairs needed
After evaluating the rust damage, it’s time to assess the repairs needed to restore the front panel. Depending on the severity of the rust, you may need to consider options such as patching, welding, or even replacing the affected areas. It’s essential to thoroughly assess the required repairs to ensure that the front panel is restored to its optimal condition. Taking the time to assess and plan the repairs will ultimately lead to a more successful restoration process.
Replacing the Bottom Inner Panel
Discovering the extent of rust on the bottom inner panel
During the removal of the front panel, it’s important to also assess the condition of the bottom inner panel. This component is prone to rust damage, particularly if Nell has been exposed to moisture or harsh weather conditions. Take a close look at the bottom inner panel and evaluate the rust issues present. This assessment will determine if a replacement is necessary to ensure the overall structural integrity of Nell.
The need for replacement
If the assessment reveals that the rust damage on the bottom inner panel is significant, it may be necessary to replace the entire panel. While this can be a more extensive restoration task, it’s crucial for maintaining the overall stability of Nell’s body. Replacing the bottom inner panel ensures that any weakened or rusted areas are addressed, providing a solid foundation for further restoration efforts.
Replacing the Top Windscreen Inner Panel
Assessing the poorly done repairs on the top windscreen inner panel
Another critical area to evaluate during Nell’s restoration is the top windscreen inner panel. Over time, this panel may have undergone poor repairs, resulting in a compromised structural integrity. Carefully inspect the top windscreen inner panel and assess the quality of any previous repairs. By identifying weak or poorly executed repairs, you can make an informed decision about the next course of action.
Deciding to replace it
If the assessment reveals that the top windscreen inner panel has been improperly repaired, it’s advisable to replace it altogether. While it may require additional time and effort, replacing this panel ensures that Nell’s structural integrity is not compromised. By investing in a proper replacement, you can be confident in the overall stability and longevity of the restoration work.
Removing Additional Parts
Cutting off the front panel completely
Once the necessary assessments have been made and repairs planned, it’s time to fully remove the front panel. Carefully cut along the marked lines to detach the front panel from Nell’s body completely. This step allows for better access to the inner components and makes room for further restoration work.
Removing the Peter vent flaps and wiring
With the front panel removed, it’s also an opportune time to remove any additional parts that may hinder the restoration process. In the case of Nell, this includes the Peter vent flaps and associated wiring. By removing these parts, you can thoroughly inspect the electrical system and address any issues that may have arisen over time.
Opportunity for electrical system inspection and repair
While the front panel is off, take advantage of the opportunity to inspect and repair the electrical system. Carefully assess the condition of the wiring and look for any signs of wear or damage. If necessary, make the appropriate repairs or replacements. Ensuring the electrical system is in optimal condition is crucial for Nell’s overall functionality and safety.
Removing the Handbrake
Accessing the handbrake from underneath
To continue the restoration process, it’s essential to remove the handbrake. Accessing the handbrake from underneath Nell allows for a more convenient removal process. Take the necessary precautions and ensure that Nell is properly supported before proceeding with this step.
Removing it to continue the restoration process
The handbrake removal is necessary to proceed with further restoration tasks. By removing the handbrake, you create more space and facilitate access to other components that require attention. Take your time and carefully detach the handbrake, ensuring that all associated parts are removed properly.
Removing the Original Taps and Lip
Opting to remove the original taps and lip
As part of the restoration process, you may consider removing the original taps and lip. This is an aesthetic choice that can give Nell a fresh look, especially if the original components are worn or damaged. Carefully assess the condition of the original taps and lip and decide whether their removal is warranted.
Preparing for the installation of the new front panel
By removing the original taps and lip, you create a clean slate for the installation of the new front panel. This step is crucial for ensuring a smooth fit and enhancing the overall appearance of Nell. Take the necessary precautions and carefully remove the original taps and lip, ensuring that no damage is caused to Nell’s body.
Conclusion
In conclusion, preparing Nell for the 2020 hire season requires a comprehensive restoration process. By following the steps outlined in this article, including the removal of the front panel and assessing any rust damage, you can set the stage for a successful restoration. Take the time to evaluate each component, address necessary repairs, and replace any damaged areas. With thorough inspection and meticulous planning, Nell will be ready to shine in the upcoming hire season, impressing clients with her impeccable condition.

