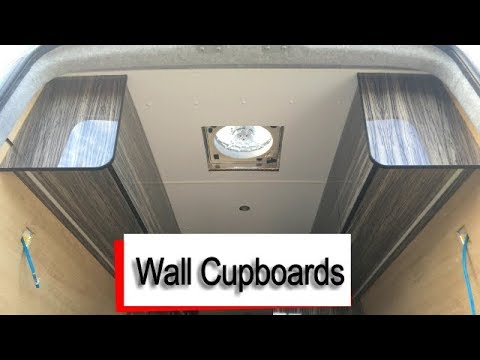
In the video “Building Wall Cupboards for a Mercedes Sprinter Campervan Conversion,” Greg Virgoe takes us through the process of constructing and installing wall cupboards in a Mercedes Sprinter van. He uses PSE timber battens and Morland Lightweight Furniture Board, combining them with plywood to create the carcass of the cupboards. The framework is then attached to the van’s lining and covered with High Gloss Zebrano Lightweight Furniture Board. Recessed LED lighting is installed using Aluminum channels, which can be controlled through the Magic Home smartphone app. The video also mentions free PDF plans for a home-built Kreg Jig Station, available in both metric and imperial measurements. Greg invites viewers to download the SketchUp model from his 3D warehouse, provide shoutouts on social media, and make donations through PayPal if they find the information beneficial. The article outlines the steps involved in constructing the wall cupboards, such as using templates to cut the furniture board, holding cables with cable ties, and using a jigsaw and belt sander for finishing touches. Greg also explains the process of building the face frame using PSE timber and attaching it to the furniture board with pocket holes. The cupboards are securely screwed into the van’s ply lining, and LED strip lights are recessed underneath for added functionality. The finished wall cupboards are described as minimalist yet strong, offering ample storage space. Overall, the article provides a comprehensive overview of the video’s content and highlights the key details and steps involved in building and installing wall cupboards for a Mercedes Sprinter camper van conversion.
Building Wall Cupboards for a Mercedes Sprinter Campervan Conversion
As a professional in the field of van conversions, I have encountered numerous requests for wall cupboards in Mercedes Sprinter campervan conversions. These cupboards not only provide much-needed storage space but also add a touch of elegance to the interior. In this comprehensive guide, I will walk you through the process of building wall cupboards for a Mercedes Sprinter campervan conversion. From designing the cupboards to adding the final touches, I will cover each step in detail to ensure your project is a success.
Materials Required
Before we dive into the construction process, let’s take a moment to gather all the necessary materials and tools. Here’s a list of what you’ll need:
- PSE timber battens: These will be used for constructing the framework of the cupboards.
- Morland Lightweight Furniture Board: This lightweight and durable material will form the body of the cupboards.
- Plywood: Plywood will be used to create the framework of the cupboards.
- Aluminium channels: These channels will hold the recessed LED lighting.
- Recessed LED lighting: To illuminate the cupboards, we will install recessed LED lighting strips.
- Cable ties: These will be used to secure the wiring in place.
- Black paint: The face frame of the cupboards will be painted black for a sleek and modern look.
- Pocket hole screws: These screws will be used to attach the face frame to the furniture board.
- LED strip lights: To add additional lighting, we will install LED strip lights.
Make sure you have all these materials on hand before starting the project to ensure a smooth workflow.
Step 1: Designing the Cupboards
The first step in building wall cupboards for a Mercedes Sprinter campervan conversion is to carefully plan and design the cupboards. It is essential to consider the dimensions of the available space in the van, as well as your storage requirements. To simplify this process, I recommend creating templates using cardboard or paper to visualize the dimensions of the cupboards.
Take into account the items you will be storing in the cupboards, such as kitchenware, clothing, or camping gear. This will help you determine the number and size of cupboards needed. Remember to consider any specific requirements you may have, such as space for a refrigerator or a specific layout for easy access.
Once you have a clear understanding of your design preferences and storage needs, you can move on to the next step.
Step 2: Cutting the Furniture Board
With the design finalized, it’s time to cut the furniture board to create the various components of the cupboards. Start by tracing the templates onto the furniture board, marking the necessary cuts with a pencil or marker.
For straight cuts, a circular saw or table saw can be used. However, for end panels and dividers that require curved cuts, I recommend using a jigsaw. This versatile tool will allow you to achieve precise cuts and smooth edges.
To give the furniture board a polished look, you can use a belt sander to round off any sharp corners. This will not only improve the aesthetics but also minimize the risk of injury when using the cupboards.
Step 3: Constructing the Carcass
The next step in building the wall cupboards is to construct the carcass or framework that will hold the furniture board pieces together. To achieve a sturdy structure, I suggest using PSE timber battens and plywood.
Begin by building the framework using the PSE timber battens. Cut the battens to the appropriate length according to the dimensions of your cupboards. Secure the battens together using screws, creating a rectangular or square frame.
To attach the framework to the van’s lining, use screws or bolts. Locate the support points in the van’s structure, such as the metal beams or pillars, and align the framework accordingly. This will ensure a secure and stable installation.
Once the framework is in place, begin assembling the carcass by attaching the furniture board pieces to the framework. Use screws or nails to secure the pieces, ensuring a snug fit. Pay close attention to the alignment and levelness of the pieces to maintain a professional finish.

Step 4: Cladding the Carcass
To enhance the appearance of the cupboards, cladding the carcass with a decorative material is essential. One popular choice is High Gloss Zebrano Lightweight Furniture Board. This stylish and durable material adds a touch of elegance to the interior while remaining lightweight.
To begin cladding, measure and cut the cladding material according to the dimensions of each section of the carcass. Using screws or nails, attach the cladding to the furniture board, ensuring a tight and seamless fit. Take care while aligning the cladding to maintain the aesthetic appeal of the cupboards.
Repeat this process for each section of the carcass until all surfaces are covered with the cladding material. Step back and admire the transformation as the cupboards take shape.
Step 5: Installing Recessed LED Lighting
Proper lighting is crucial in a campervan conversion, and installing recessed LED lighting in the wall cupboards will not only provide ample illumination but also create a cozy ambiance. To install recessed LED lighting, we will utilize aluminium channels.
Measure the length of each cupboard section and cut the aluminium channels accordingly. These channels will serve as a housing for the LED lighting strips. Attach the channels to the inside of the cupboards using screws or adhesive tape, ensuring they are positioned parallel to the inner edges.
Step 6: Wiring and Controlling the Lighting
To power and control the recessed LED lighting, we need to run cables and connect them to a power source. Begin by running the cables from the cupboards to a designated power outlet in the van. Secure the cables in place using cable ties or adhesive clips to minimize any potential hazards.
Next, connect the LED lighting strips to the cables. Ensure the connections are secure, and no loose wires are exposed. Once the wiring is complete, it’s time to control the lighting.
For added convenience, consider connecting the LED lights to a smartphone app such as the Magic Home app. This app allows you to control the lighting remotely, change the color, and adjust the brightness to create the desired atmosphere inside the campervan.
Step 7: Attaching the Face Frame
To add the final touch to our wall cupboards, we will attach a face frame using PSE timber. This frame not only enhances the aesthetics but also provides additional structural support.
Start by measuring and cutting the PSE timber to the desired dimensions for the face frame. Once cut, paint the timber black or any color that complements your campervan’s interior. This step adds a sleek and modern look to the cupboards.
Secure the face frame to the furniture board by using pocket hole screws. These screws will create a strong and discreet attachment, giving the cupboards a seamless appearance. Ensure the frame sits flush with the furniture board for a professional finish.
Step 8: Installing the Cupboards in the Van
With the cupboards fully constructed, it’s time to install them in the van. Carefully position the cupboards in their designated locations, ensuring they align with the support points in the van’s structure. Use screws or bolts to secure the cupboards to the van’s lining, making sure they are stable and secure.
Take a step back and admire your work as the cupboards become an integrated part of the campervan interior. The placement of the cupboards should be convenient and easily accessible, allowing you to make the most of the storage space.
Step 9: Adding LED Strip Lights
To further enhance the lighting in the campervan, consider adding LED strip lights to the underside of the cupboards. These lights not only provide additional illumination but also create a warm and inviting atmosphere.
Measure the length of the cupboards and cut the LED strip lights according to the measurements. Install the lights using adhesive backing or mounting clips. Ensure the lights are positioned uniformly and securely attached to prevent any sagging or drooping.
Step 10: Final Touches and Conclusion
As you reach the final stages of your cupboards’ construction, take a moment to appreciate the minimalist yet robust addition to your campervan. The cupboards offer ample storage space, maximizing the functionality of your Mercedes Sprinter conversion.
I encourage you to share your project on social media platforms, showcasing your craftsmanship and inspiring others in their campervan conversions. Don’t forget to link back to useful resources, such as tutorials or suppliers, that may benefit fellow enthusiasts.
If you found this guide helpful and would like to support the creation of more content like this, consider making a donation or providing sponsorship. Your contribution will enable me to continue sharing valuable insights and assisting the campervan community.
Lastly, I would like to express my deepest gratitude to all viewers and subscribers. Your support and engagement have been invaluable, and I look forward to assisting you in future projects. Happy building!

