

The article titled “Mercedes Sprinter Camper Van – Roof Battens Installation” covers the process of installing roof battens in a Mercedes Sprinter camper van. The author, Greg Virgoe, provides a comprehensive guide on the steps involved, including the installation of plywood battens, first fix electrics, and foil tape for the vapor barrier. The article also mentions the use of Kingspan thermaboard for insulation, stick pins for securing the insulation, and self-drilling screws for attaching the battens to the roof. Additionally, the author shares information about the tools used, such as the Dewalt 18v Li-Ion impact driver, and offers a donation link for those who find the information helpful.
In the second paragraph, Greg Virgoe introduces the article by welcoming readers back to the Mercedes Sprinter van conversion project. He mentions the recent delivery of the boiler and furniture board, as well as the selection of high-gloss zabrze and vinyl-covered ply for the headliner. The author highlights the importance of tidying up loose ends, including the installation of battens, vapor barrier, and socket boxes, before moving on to ply lining the van and building the furniture. Greg Virgoe concludes the introduction by encouraging readers to subscribe to his channel for future updates on the project and to share his videos on social media.
Roof Battens Installation
As a professional, I understand the importance of a properly installed roof batten system. Roof battens are essential for providing stability and support to the roof structure, as well as serving as a base for various other components of the roof. In this article, I will guide you through the comprehensive process of roof battens installation, from preparation to completion.
Preparation
Before beginning any installation work, it is crucial to gather all the necessary tools and materials. For roof battens installation, you will need a tape measure, pencil, circular saw, drill, countersink bit, self-tapping screws, Sikaflex 512 sealant, stick pins, foil tape, and foil face bubble wrap. Additionally, ensure that the van or vehicle on which you are installing the roof battens is clean and dry, as any dirt or moisture can compromise the integrity of the installation.
Cutting the Ply Strips
The first step in the installation process is to cut the ply strips to the desired length. Measure and mark the plywood sheets according to your roof dimensions, ensuring that they are cut to the appropriate width. Use a circular saw to make precise cuts, and remember to exercise caution and wear appropriate safety gear during this step. Once the strips are cut, it is advisable to drill countersink holes in them to facilitate the attachment of the battens later on.

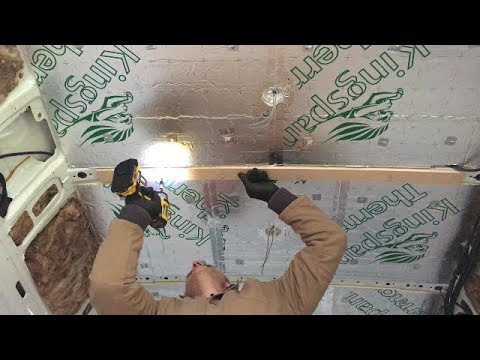
Installing the Battens
Once the ply strips are ready, it is time to install the battens. Position and align the battens on the roof, ensuring that they are evenly spaced and parallel to each other. It is recommended to attach the battens to the ribs of the roof for added stability. You can use self-tapping screws to secure the battens in place, but make sure to ensure a flush fit to prevent any protrusions or inconsistencies.
Securing the Battens to the Roof
To further enhance the stability of the roof battens, it is essential to secure them to the roof using Sikaflex 512 sealant. Apply Sikaflex 512 to the back of the battens before screwing them to the roof. This sealant not only acts as an adhesive but also helps prevent vibration and noise by creating a secure barrier between the battens and the roof surface. Take care to follow the manufacturer’s instructions for application and curing times.

Using Sikaflex 512 Sealant
Sikaflex 512 sealant is a high-quality, multi-purpose adhesive that provides excellent bonding strength and weather resistance. It is specifically formulated for use in construction and automotive applications, making it ideal for securing roof battens. When applying Sikaflex 512, ensure that the surface is clean and dry to maximize adhesion. Apply the sealant evenly, using a caulking gun or similar tool, and ensure that the entire back surface of the battens is covered before screwing them into place.
Completing the Vapour Barrier
A vapour barrier is an essential component of any roof insulation system, as it prevents the passage of moisture into the roof structure. To complete the vapour barrier, seal the stick pins used during the installation process with foil tape. Additionally, ensure that all joints and cut recesses are properly sealed to maintain the integrity of the barrier. Apply foil tape to the battens to create a continuous, airtight seal and prevent any potential air leaks.

Insulating with Foil Face Bubble Wrap
Insulation is a critical element in creating a comfortable and energy-efficient living space within a vehicle. Foil face bubble wrap is an excellent insulating material that reflects radiant heat, keeping the interior cool in hot weather and warm during colder months. Wrap the ceiling with foil face bubble wrap, making sure to cover the entire surface. To maximize the insulating effect, it is recommended to create multiple layers of the foil barrier, ensuring overlapping seams for maximum coverage.
Creating a Thermal Break
A thermal break is an integral part of a roof batten system, as it prevents the transfer of heat or cold from the vehicle’s steel structure to the interior living space. To create a thermal break, use a plywood strip that is cut to size and positioned between the steel ribs of the roof and the battens. By installing the headliner without directly contacting the steel ribs, you can ensure better insulation and reduce condensation and heat transfer.

Fixing the Headliner to the Battens
With the battens installed and the thermal break in place, it is time to fix the headliner to the battens. The headliner serves as the interior finish of the roof and is typically made of foam-backed fabric or similar material. Carefully position the headliner, making sure it is centered and aligned correctly. Use appropriate fastening methods, such as staples or adhesive, to secure the headliner to the battens, taking care not to damage the fabric or material during the process.
Planning the First Fix
The completion of the roof battens installation marks an important milestone in the overall project. With the structural foundation in place, you can now proceed with the planning of the first fix, which involves the installation of electrical wiring, plumbing systems, and other necessary infrastructure. It is crucial to take the time to carefully plan and execute the first fix to ensure that all the required systems are properly integrated and hidden within the vehicle’s walls and ceilings.
Conclusion
In conclusion, proper roof battens installation is vital for ensuring the stability, insulation, and overall performance of a vehicle’s roof structure. By following the steps outlined in this article, you can achieve a professional and reliable installation that will provide a solid foundation for future components and systems within the vehicle. With the completion of the roof battens installation, you can now proceed with confidence to the next stages of your project, such as the furniture build and appliance installation.