

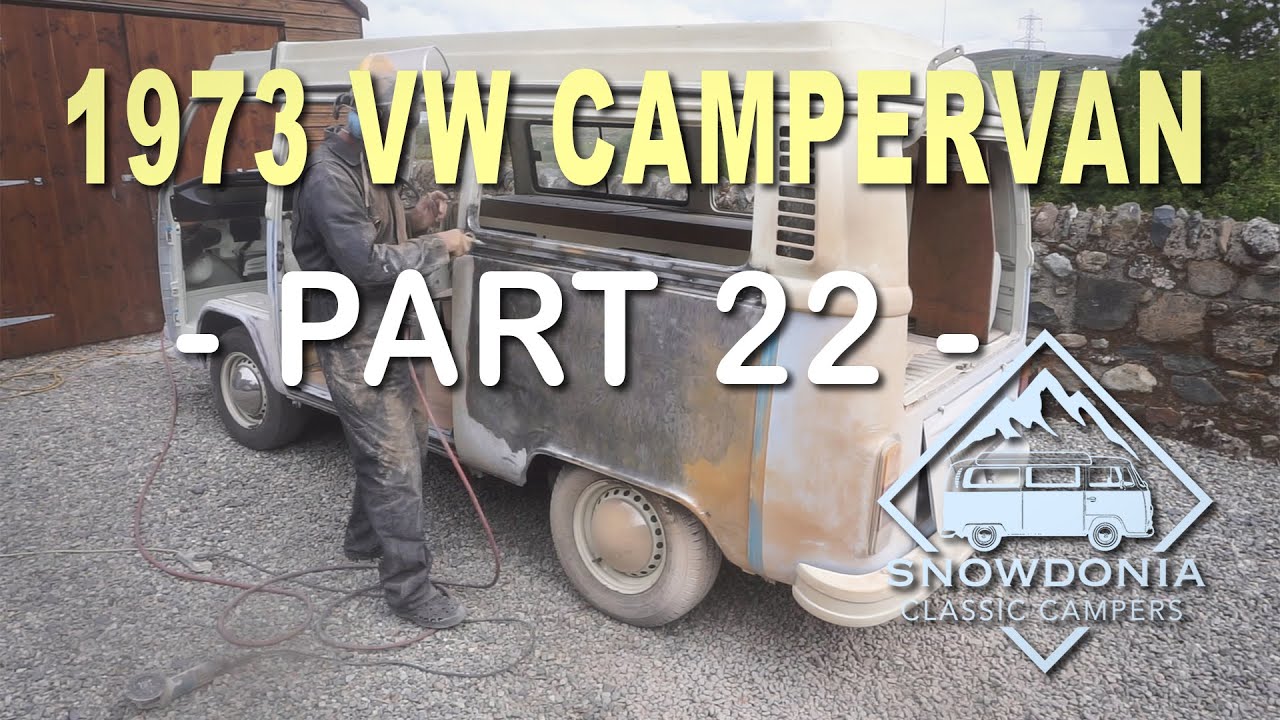
Part 22 of the restoration project on a 1973 VW Campervan, undertaken by Snowdonia Classic Campers, focuses on preparing the campervan for painting. The video showcases the process of sanding down the body panel and assessing the condition of the paint. The narrator decides to strip off all the old paint and repair any damage found, including replacing the rear wing and inner wheel arch. The video concludes with the preparation work completed, and the narrator eagerly awaiting the arrival of the repair panels for the next stage of the restoration.
In this episode of the 1973 VW Campervan Restoration series, Snowdonia Classic Campers takes you through the crucial step of preparing the campervan for painting. The video follows the process of sanding down the body panel and evaluating the state of the paint, leading to the decision to strip off all prior layers and repair any identified damage. From replacing the rear wing to addressing rust concerns, the narrator shares the necessary steps taken to ensure a successful restoration. With the preparation work completed, anticipation builds as they await the arrival of the repair panels, marking the next chapter in this captivating restoration journey.
Check out these awesome Van Life Guides!
Removing the Old Paint
When it comes to repainting a campervan, one of the first steps is removing the old paint. This is essential to ensure a clean and smooth surface for the new paint to adhere to. There are several methods you can use to remove the old paint, but one of the most popular and effective options is sanding.
Sanding the Body Panel
To begin the process of removing the old paint, you’ll need to sand the body panel of your campervan. This can be done using a sander or by hand with sandpaper. Start by using coarse-grit sandpaper to remove the majority of the paint, then switch to finer-grit sandpaper to smooth out the surface. Be sure to wear protective goggles and a dust mask to prevent any paint particles or dust from getting into your eyes or lungs.
Assessing the Condition of the Paint
After sanding the body panel, take a moment to assess the condition of the paint. Look for any areas where the paint may be chipping, cracking, or damaged. These areas will need to be addressed before applying the new paint. If you notice any significant damage, such as dents or deep scratches, you may need to consider repairing these areas before moving forward with the repainting process.
Stripping off the Old Paint
If sanding alone isn’t sufficient to remove all of the old paint, you may need to consider using a paint stripper. Paint strippers are chemical solutions that help to break down the old paint, making it easier to scrape away. Be sure to follow the instructions provided with the paint stripper and take the necessary safety precautions, such as wearing gloves and working in a well-ventilated area.
Repairing Damage
Once the old paint has been removed, it’s time to assess any damage that may need to be repaired. This could include small dents, scratches, or other imperfections in the body panel. Depending on the extent of the damage, you may be able to use a filler or putty to smooth out the surface. For more severe damage, such as larger dents, you may need to consider using a dent puller or seeking professional assistance to ensure a proper repair.
Replacing the Rear Wing and Inner Wheel Arch
In some cases, the repainting process may also involve replacing certain parts of the campervan, such as the rear wing or inner wheel arch. If you have identified damage to these areas or if they are rusted or deteriorated, it’s important to take the necessary steps to replace them before proceeding with the painting process.
Identifying the Damage
Begin by carefully inspecting the rear wing and inner wheel arch of your campervan. Look for any signs of damage, such as rust, dents, or holes. If the damage is significant and cannot be repaired, it’s likely that you’ll need to replace these parts.
Ordering the Replacement Parts
Once you have identified the damage and determined that you need to replace the rear wing and inner wheel arch, it’s time to order the replacement parts. Contact a reputable supplier or manufacturer to ensure that you are getting the correct parts for your specific campervan model. Provide them with the necessary information, such as the make, model, and year of your campervan, to ensure an accurate order.
Removing the Damaged Parts
With the replacement parts in hand, carefully remove the damaged rear wing and inner wheel arch from your campervan. This may involve using a combination of hand tools, such as wrenches or screwdrivers, depending on how the parts are secured. Take your time during this process to avoid causing any additional damage to your campervan.
Fitting the New Parts
Once the damaged parts have been removed, it’s time to fit the new rear wing and inner wheel arch. Ensure that the parts are properly aligned and secured in place. Follow any instructions or guidelines provided by the manufacturer to ensure a proper installation. This step is crucial to ensure that the new parts fit seamlessly with the rest of the campervan and provide the necessary structural support.
Preparing the Surface
Before you can begin painting your campervan, it’s essential to prepare the surface to ensure a clean and smooth finish. This involves cleaning the body panel, applying rust treatment if necessary, filling in any imperfections, and carefully sanding the surface.
Cleaning the Body Panel
Start by thoroughly cleaning the body panel of your campervan. Use a mild detergent or automotive soap and water to remove any dirt, grease, or debris. Be sure to rinse the panel thoroughly with clean water to remove any soap residue. This step is important to ensure that the paint adheres properly and to prevent any contaminants from affecting the finished result.
Applying Rust Treatment
If you notice any areas of rust on the body panel, it’s important to treat them before applying the new paint. Rust can continue to spread and compromise the integrity of the paint job if left untreated. Use a rust treatment product to remove any existing rust and prevent further corrosion. Apply the treatment according to the manufacturer’s instructions and be sure to wear protective gloves and goggles.
Filling in Imperfections
After cleaning and treating the body panel, take the time to fill in any imperfections or small dents. This can be done using a filler or putty specifically designed for automotive use. Follow the instructions provided with the filler or putty to properly apply and smooth out the surface. Once the filler or putty has dried, use sandpaper to gently sand the area and ensure a smooth finish.
Sanding the Surface
The final step in preparing the surface is to sand it to create a smooth and even texture. Use a fine-grit sandpaper and sand in a circular motion to remove any remaining imperfections or rough areas. Sanding also helps to roughen the surface slightly, which improves the adhesion of the paint. Be sure to wipe away any dust or debris before proceeding to the next step.

If You Love Van Life, You Will Not Want To Miss These, Click Here to Read More Awesome!
Masking off the Areas to be Painted
When painting a campervan, it’s important to mask off any areas that you do not want to be painted. This prevents overspray and ensures a clean, professional-looking finish. To effectively mask off the areas, identify the specific parts of the campervan that need to be protected and gather the necessary materials.
Identifying the Areas
Carefully examine your campervan and identify the specific areas that you need to mask off. This may include windows, trim, handles, and any other parts that you want to keep paint-free. Take your time during this step to ensure that you don’t overlook any areas that need to be protected.
Using Tape and Plastic
Once you have identified the areas that need to be masked off, use painter’s tape to securely cover these parts. Ensure that the tape is applied firmly and smoothly to create a tight seal. Additionally, use plastic sheets or drop cloths to cover larger areas, such as the windows or wheels. This will prevent any paint from accidentally coming into contact with these surfaces.
Protecting the Interior
In addition to masking off the exterior areas, it’s also important to protect the interior of your campervan. Close all windows and doors to prevent any overspray from getting inside. If possible, cover the seats, dashboard, and other interior surfaces with plastic or drop cloths to protect them from paint particles or accidental spills.
Choosing the Right Paint
Selecting the right paint for your campervan is a crucial decision that will greatly impact the overall appearance and longevity of the finished result. There are several factors to consider when choosing the paint, including researching the options, matching the original color, and considering the desired finish.
Researching the Options
Before choosing a specific paint, it’s important to research the available options. Consider factors such as the durability, ease of application, and resistance to fading or chipping. Read product reviews and consult experts or professionals in the field to gain a better understanding of the different types of paint available and their suitability for your campervan.
Matching the Original Color
If you want to maintain the original appearance of your campervan, matching the original color is essential. This can be done by either purchasing an exact match color from the vehicle manufacturer or having a professional color match performed. Keep in mind that over time, the original paint may have faded or changed slightly, so it’s important to take this into account when selecting the paint.
Considering the Finish
In addition to choosing the right color, it’s also important to consider the desired finish of your campervan. Different types of paint finishes offer different levels of shine and reflectivity. Common options include matte, satin, and glossy finishes. Consider the overall aesthetic you are aiming for and select a paint that will complement the style of your campervan.
Priming the Campervan
Before applying the base coat of paint, it’s important to prime the surface. Priming serves as a foundation for the paint, providing better adhesion and a smoother finish. Properly priming your campervan will help to ensure a professional-looking paint job that lasts.
Preparing the Primer
Start by selecting a primer that is specifically designed for automotive use and is compatible with the type of paint you have chosen. Read the manufacturer’s instructions and follow them carefully to ensure proper application. It’s also important to properly prepare the primer before applying it to the campervan. This may involve mixing the primer with a activator or thinner and stirring it thoroughly.
Applying the Primer
Once the primer is properly prepared, it’s time to apply it to the surface of your campervan. Use a paint spray gun or brush to evenly distribute the primer. Apply the primer in thin, even coats, allowing each coat to dry before applying the next. This will help to ensure a smooth and even finish. Be sure to follow the manufacturer’s instructions regarding drying times and recommended number of coats.
Ensuring Even Coverage
When applying the primer, it’s important to ensure even coverage across the entire surface of your campervan. Take your time during this step and pay close attention to any areas that may require additional coats or touch-ups. This will help to create a solid foundation for the base coat of paint and ensure a professional-looking finish.
Painting Techniques
With the surface primed, it’s time to apply the base coat of paint to your campervan. There are several techniques you can use to achieve a smooth and even finish, including spray painting, roller techniques, and brush techniques. Consider your level of experience and the specific requirements of your campervan when choosing the painting technique.
Spray Painting
Spray painting is a common technique used for painting campervans due to its ability to provide an even and consistent coat of paint. To spray paint your campervan, it’s important to use a high-quality paint spray gun and follow the manufacturer’s instructions. Apply the paint in thin, even coats, moving the spray gun in a sweeping motion to cover the entire surface. Be sure to overlap each pass slightly to ensure even coverage.
Roller and Brush Techniques
If you prefer a more hands-on approach or if you don’t have access to a paint spray gun, you can also use roller and brush techniques to apply the paint. This method involves using a paint roller or brush to apply the paint in a controlled manner. When using a roller, ensure that you choose a high-quality roller sleeve designed for smooth surfaces. When using a brush, opt for one with synthetic bristles, which tend to provide a smoother finish.
Achieving a Smooth Finish
Regardless of the painting technique you choose, it’s important to take your time and aim for a smooth and even finish. Apply the paint in thin, even coats to avoid drips or pooling. If desired, sand the surface lightly between coats to remove any imperfections or rough areas. This will help to create a professional-looking paint job that enhances the overall appearance of your campervan.
Applying the Base Coat
After priming the campervan, it’s time to apply the base coat of paint. This is the main layer of color that will provide the desired appearance to your campervan. The process involves mixing the paint, using a spray gun to apply it, and applying multiple coats for an even and vibrant finish.
Mixing the Paint
Start by carefully measuring and mixing the paint according to the manufacturer’s instructions. This may involve adding a specific ratio of thinner or activator to achieve the desired consistency and drying time. Properly mixing the paint is crucial to ensure a smooth and consistent application.
Using a Spray Gun
When applying the base coat of paint, a paint spray gun is the preferred tool for achieving an even and professional finish. Follow the manufacturer’s instructions for setting up and using the spray gun, including adjusting the air pressure and spray pattern. Hold the spray gun at a consistent distance from the surface of your campervan and move it in a steady back-and-forth motion to cover the entire area.
Applying Multiple Coats
To achieve a vibrant and opaque color, it’s important to apply multiple coats of the base paint. Allow each coat to dry according to the manufacturer’s instructions before applying the next. This will help to ensure an even and consistent color across the entire surface of your campervan. Take your time during this process and observe the drying times to avoid any issues or imperfections.
Protective Clear Coat
To protect the base coat of paint and provide a glossy and long-lasting finish, it’s important to apply a protective clear coat. This clear coat acts as a shield against UV rays, weathering, and scratches, ensuring that your campervan maintains its appearance for years to come.
Choosing the Clear Coat
When selecting a clear coat, look for a high-quality automotive clear coat that is specifically designed for use on campervans. Consider factors such as durability, ease of application, and drying time. It’s important to choose a clear coat that is compatible with the type of paint you have used and follow the manufacturer’s instructions regarding application and drying times.
Applying the Clear Coat
Once you have chosen the clear coat, it’s time to apply it to the surface of your campervan. Follow the manufacturer’s instructions regarding the application process, including the recommended number of coats and drying times. Use a paint spray gun or brush for even distribution and ensure that each coat is applied in a thin and consistent manner. Take your time during this step to avoid any drips or uneven coverage.
Allowing for Drying Time
After applying the clear coat, it’s important to allow for adequate drying time. This will vary depending on the specific product and manufacturer’s instructions. Avoid touching or exposing the painted surface to any elements until the clear coat has fully cured. This will help to ensure a smooth and glossy finish that protects the base coat of paint.
Conclusion
By following the steps outlined in this comprehensive guide, you will be well on your way to achieving a professional-quality paint job for your campervan. From removing the old paint and assessing the condition of the surface to choosing the right paint and applying it with care, each step plays a crucial role in the overall success of the project.
Successful preparation for painting involves patience, attention to detail, and a commitment to achieving a flawless result. By taking the time to properly sand the surface, repair any damage, and prime the campervan, you will lay the groundwork for a beautiful and lasting paint job. Additionally, carefully masking off the areas to be painted and choosing the right paint color and finish will ensure that your campervan looks its best.
Finally, through using proper painting techniques, including spray painting or roller and brush techniques, and applying multiple coats of paint, you will achieve a vibrant and smooth base coat. Finish off with a protective clear coat to preserve the color and shine, and your campervan will be ready for its next adventure.
With the completion of the repainting process, you can now look forward to the next stage of restoration with excitement. Your freshly painted campervan will not only look aesthetically pleasing but will also be better protected against the elements, allowing you to enjoy many more journeys in style and comfort.