

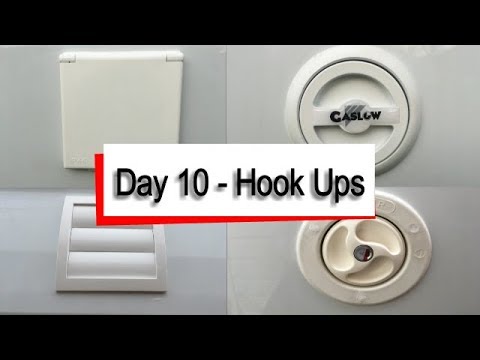
I have recently come across a video by Greg Virgoe, where he demonstrates the process of cutting holes in his Mercedes Sprinter Camper Van for various external hook-ups. In the video, Greg explains that the holes are being made for Autogas, Electric, Water, and shower extract vent connections. To ensure precision, Greg utilizes Erbauer Bi-Metal Hole Saws, which are easily accessible both locally and online. Safety is a priority in this project, as Greg recommends locating the Gaslow connection below floor level for easy venting in case of a leak. Furthermore, he plans to build a sealed gas bottle chamber with a drop-out vent in the floor to effectively vent any gas leaks. The entire gas system will also undergo a pressure test and certification by an LPG gas safe engineer. Greg Virgoe welcomes questions and encourages viewers to subscribe and click the notification bell for future episodes, while also offering the option for viewers to make donations to support future videos through paypal.me/GregVirgoe.
In the Sprinter van conversion video by Greg Virgoe, he goes into detail about his process of cutting holes in the side of the van for external hook-ups. Greg covers a wide range of services including Autogas, Electric, Water, and bathroom extract fan connections. He emphasizes the importance of using precise tools, mentioning the use of Erbauer Bi-Metal Hole Saws for accurate hole cutting. To ensure a secure fit, Greg uses Sikaflex and self-tapping screws for weatherproofing, and he suggests using a professional for gas connections. Additionally, he encourages viewers to ask questions in the comments section for any further assistance they may need.
Sprinter Van Conversion: Cutting Holes for External Hook-Ups

Introduction
As part of a comprehensive sprinter van conversion, cutting holes for external hook-ups is a crucial step. These holes allow for the installation of various external connections, such as autogas, waste, water, and solar panel cables. This article aims to provide a detailed guide on how to properly cut these holes, considering factors such as safety, compliance, and convenience. By following the outlined steps and considerations, individuals can ensure a successful and professional sprinter van conversion.
Preparing for External Hook-Ups
Before diving into the process of cutting holes for external hook-ups, it is important to first identify the specific hook-ups required. These may include autogas connection, waste and water pipework, and even solar panel cables. By understanding the necessary hook-ups, individuals can plan the exact locations for each connection, considering both safety and convenience factors.
Choosing the Right Hole Saw
The selection of the appropriate hole saw is paramount when it comes to cutting holes for external hook-ups. The hole saw must be capable of cutting through the chosen material without causing any damage or compromising the integrity of the van. One recommended option is the Erbauer Bi-Metal hole saws, known for their durability and precision. These hole saws offer a range of sizes, ensuring a perfect fit for various hook-up connections. They are readily available in hardware stores and online, making them easily accessible for individuals undertaking a sprinter van conversion.
Cutting Holes for Autogas Connection
Cutting holes for the autogas connection requires precision and accuracy to ensure a secure and leak-free installation. The first step is to determine the optimal location for the autogas connection, considering factors such as accessibility and safety. Once the location is identified, the chosen hole saw can be used to carefully cut the hole. It is crucial to follow the guidelines provided by the autogas system manufacturer to ensure proper installation. Additionally, building a sealed gas bottle chamber for venting is necessary to comply with safety regulations and prevent gas leaks.

Building a Sealed Gas Bottle Chamber
A sealed gas bottle chamber is an essential component of the gas system in a sprinter van conversion. This chamber provides a secure and ventilated area to house the gas bottles, ensuring proper ventilation in the event of a leak. Designing and constructing the chamber should be done with careful consideration to safety standards and regulations. Adequate ventilation is crucial to prevent the buildup of potentially harmful gases. Consulting a professional or seeking guidance from an LPG Gas Safe engineer is highly recommended to ensure the chamber is properly built and complies with safety requirements.
Testing and Certifying the Gas System
Once the gas system, including the autogas connection and sealed gas bottle chamber, is installed, it is essential to test and certify the system. Pressure testing is a critical step to ensure that there are no leaks or faults in the system. This process involves pressurizing the gas system and checking for any pressure drops, indicating potential leaks. It is highly recommended to seek the services of an LPG Gas Safe engineer for the certification process. The engineer will thoroughly inspect the gas system, ensuring compliance with safety standards and regulations.

Cutting Holes for Waste and Water Pipework
In addition to the gas system, cutting holes for waste and water pipework is necessary for a fully functional sprinter van conversion. Determining the locations for waste and water connections is the first step. These locations should be chosen with convenience and accessibility in mind, taking into account the layout and design of the van’s interior. Once the locations are identified, precise holes can be cut using the appropriate hole saw. Care should be taken to avoid damaging any existing structures or systems within the van. After cutting the holes, the waste and water connections can be installed, ensuring a secure and leak-free system.
Creating Openings for Gas Pipe and Boiler Flue Terminal
Creating openings for the gas pipe and boiler flue terminal is another crucial step in the sprinter van conversion process. Suitable positions for these connections should be identified, considering factors such as the layout of the interior and safety regulations. Once the positions are determined, precise holes can be cut using the appropriate hole saw. It is important to ensure that the holes are properly sized for the specific connections. After cutting the holes, the gas pipe and boiler flue terminal can be connected and securely fastened according to manufacturer guidelines.

Routing Holes for Solar Panel Cables
For those incorporating solar panels into their sprinter van conversion, routing holes for solar panel cables is necessary to ensure a clean and organized installation. The specific locations for these cables should be planned in advance. Once the locations are chosen, the appropriate hole saw can be used to cut the holes. It is important to consider the size and number of cables to be routed, ensuring the holes are large enough to accommodate them. Properly routing and securing the cables will prevent any interference with other systems or potential damage to the cables themselves.
Weatherproofing the Holes
After cutting all the necessary holes for external hook-ups, it is essential to weatherproof them. This step involves sealing the holes to prevent water ingress and maintain the integrity of the van. Various weatherproofing products, such as sealants and grommets, can be used to ensure a watertight seal around the holes. Care should be taken to follow the manufacturer’s instructions for proper application and ensure a professional finish.
Conclusion
Converting a sprinter van into a functional and comfortable living space requires proper planning and execution. Cutting holes for external hook-ups, such as autogas connection, waste and water pipework, and solar panel cables, is a crucial part of the process. By following the steps and considerations outlined in this article, individuals can ensure a successful sprinter van conversion. Professional assistance, especially for gas connections, is strongly encouraged to ensure compliance with safety standards and regulations. With proper preparation and attention to detail, individuals can create a fully functional and comfortable living space within their sprinter van.