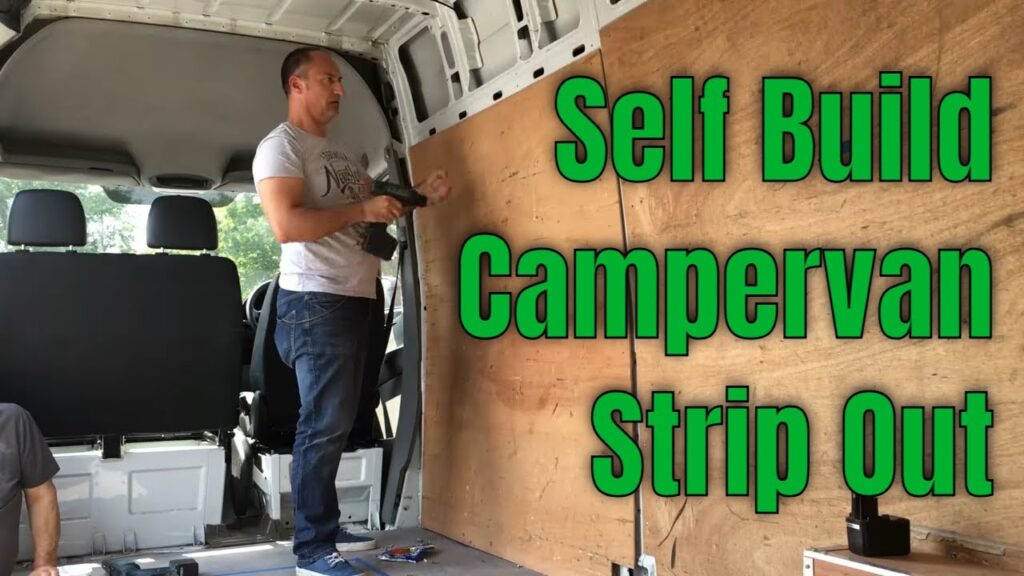
The focus of this article is on the process of stripping out the van ply lining during a self-build campervan conversion. In order to create more natural light in the living area, the existing plywood van lining and metal bulkhead are removed. Once the plywood is taken out, the next steps involve running electrical cables and fitting thermal insulation. The article also mentions that in the upcoming video, new side windows will be installed. The author encourages readers to subscribe for video updates and expresses gratitude for their viewership.
Moving on, the article provides a brief overview of the van’s layout and design plans. The long-wheelbase Sprinter is described as having a garage area for storing bikes, a bed section, a shower and toilet cubicle, a kitchen cupboard with a cooker and sink, and an L-shaped bench seat that can also be converted into a double bed. The author emphasizes the need to remove the ply panels to insulate the van and properly install cables and wiring, setting the stage for the next stage of the conversion: installing windows. Readers are encouraged to subscribe and enable notifications for future video uploads.
Strip Out Van Ply Lining – Self Build Campervan
Introduction
When embarking on a self-build campervan project, one crucial task is to strip out the ply lining in the van’s interior. While the ply lining might have served its purpose in protecting the van’s walls, removing it opens up new possibilities for customization and renovation. This article will discuss the benefits of stripping out the ply lining, the tools and materials needed, and provide a step-by-step guide on how to successfully achieve this task.
Benefits of Stripping Out the Ply Lining
Removing the ply lining from a van offers several benefits to those undertaking a self-build campervan project. Firstly, it provides a blank canvas for the individual to design and personalize the interior space according to their specific needs and preferences. By stripping out the ply lining, one can create a more functional and efficient layout, maximizing the available space.
Additionally, removing the ply lining allows for a comprehensive inspection of the van’s structure. This provides an opportunity to identify any potential issues such as rust, water leaks, or damage to the interior framework. Addressing these problems early on ensures a solid foundation for the campervan conversion, ensuring a safe and durable end result.

Tools and Materials Needed
Before beginning the ply lining removal process, it is important to gather the necessary tools and materials. This includes:
- Screwdriver or cordless drill with screwdriver bits
- Pry bar or crowbar
- Socket set
- Utility knife
- Wire cutters
- Protective gloves
- Dust mask
- Safety glasses
- Plastic sheeting or drop cloths
- Cleaning supplies (e.g., all-purpose cleaner, sponge, rags)
- Insulation materials (e.g., foam board, spray foam, reflectix)
- Electrical cables and connectors
Step 1: Understanding the Existing Ply Lining
Before diving into the removal process, it is essential to understand how the existing ply lining is installed in the van. Typically, the panels are secured with screws or bolts and may also be glued to the van’s walls. By identifying these attachment points, one can proceed with confidence and avoid any unnecessary damage to the van’s interior.

Step 2: Removing the Ply Panels
To begin removing the ply panels, start by carefully unscrewing or removing any visible screws or bolts securing them to the van’s walls. Once the fasteners are removed, gently pry the panels away from the walls using a pry bar or crowbar. Take your time and work slowly to prevent any sudden movements that could cause damage.
If the panels are glued, a utility knife can be used to score along the edges to separate the glue bond. Gradually peel off the panel, ensuring not to damage the van’s walls in the process. Repeat this process for each ply panel until all have been successfully removed.
Step 3: Removing the Metal Bulkhead
Many vans come equipped with a metal bulkhead separating the cabin from the cargo area. This bulkhead often needs to be removed to create a more open space for the campervan conversion. Use a socket set to remove any screws or bolts securing the bulkhead in place. Once the fasteners are removed, carefully slide or maneuver the bulkhead out of the van, taking care not to damage any surrounding components.

Step 4: Inspecting the Van
Now that the ply lining and bulkhead have been removed, it is essential to thoroughly inspect the van’s interior for any signs of damage, rust, or leaks. Pay close attention to areas around windows, doors, and the roof. It is recommended to address any issues discovered during this inspection promptly. Repair any rusted or damaged areas and ensure a watertight seal to prevent future problems.
Step 5: Running Electrical Cables
With the interior now exposed, this is an opportune time to plan and run any necessary electrical cables for lighting, power outlets, or other electrical components. Carefully map out the desired locations for these fixtures and use wire cutters to create access points for the cables. Ensure to follow proper electrical safety guidelines and consult a professional if needed.

Step 6: Fitting Thermal Insulation
Proper insulation is crucial for maintaining a comfortable and energy-efficient campervan interior. After assessing the insulation needs based on the climate and intended use, proceed to fit the chosen insulation materials. This may involve cutting and attaching foam board insulation to the van’s walls, using spray foam to fill gaps and crevices, and adding reflective insulation such as reflectix to windows or the roof.
Step 7: Cleaning and Preparing the Van
After completing all the necessary tasks, it is crucial to thoroughly clean the van’s interior. Remove any debris, dust, or leftover adhesive from the ply lining removal process. Use all-purpose cleaner and a sponge or rag to wipe down the walls, floor, and ceiling. This ensures a clean surface for subsequent steps in the campervan conversion process.
Conclusion
Stripping out the ply lining in a van is a significant step towards creating a personalized and functional campervan. By removing the existing panels, inspecting the van’s structure, and running electrical cables, one can lay the groundwork for a successful self-build project. Additionally, fitting thermal insulation and thoroughly cleaning the interior contribute to creating a comfortable and efficient living space. With the right tools, materials, and careful execution, the process of stripping out the ply lining can be accomplished with relative ease.

